Administration - Search
Path / Administration areaSearch This documentation applies to version 2.X of the plugin.Here you can create an unlimited number of search items and use them on your website. Each search item has different options that can be customized to your needs when filtering the calendars availability.
Important information
There are a set of conditions for the calendars to be displayed in search results:
- A search can be used only for days or only for hours. If the hours are enabled, only calendars that have availability set for hours will be displayed. If the hours are disabled, in the search settings, only calendars that have availability set for days will be displayed.
- Each calendar needs to have a post/page ID attached to it. Search results display: the post featured image, excerpt (description) and the link of the page/post where the calendar is displayed (this is why the post ID is needed).
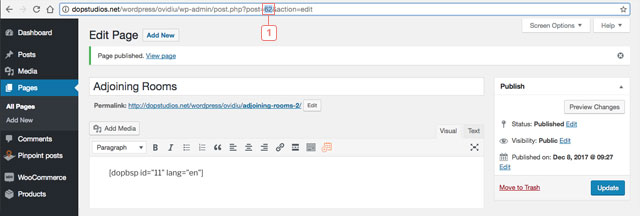
You can find the Post ID of a page here:
- If you create a custom post type the post ID is attached automatically, but for calendars that are added in pages using shortcodes you need to add the post/page ID manually.
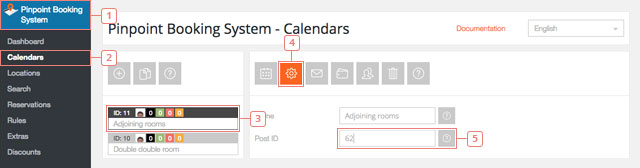
- To attach the page/post ID manually to a calendar go to: WordPress back end -> Pinpoint Booking System -> Calendars -> Select the calendar -> Edit calendar settings -> enter the ID in Post ID option. To find the post/page ID please read this instructions from WordPress codex.
For calendars to appear in search map you need to attach them to locations. Please view Locations documentation for more informations.
Add a search item
Step 1Add a search item
After you clicked the button, the search item will appear in the list below.
Set a search item data
Step 1Select the search item from the list to display the data.Field 2Change name.Item 3Exclude calendars from search. Only calendars that have a post/page ID attached and have availability set only for hours or only for days, depending on search item settings, are displayed.

Button 4Display search item data.Button 5Display search item settings.Button 6Delete search item.
Search item settings
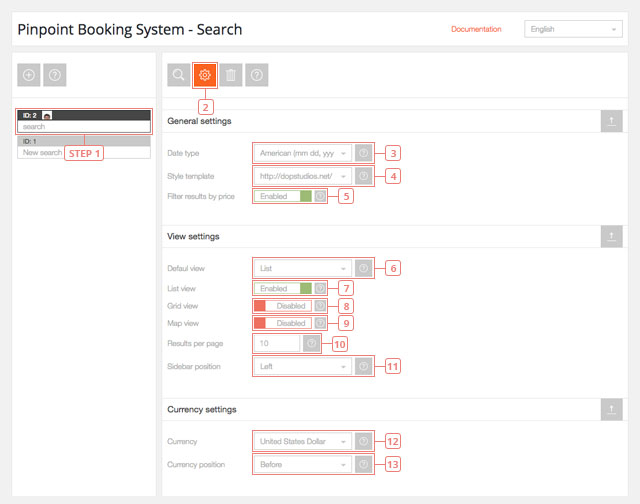
Step 1Select the search you want to edit.Button 2Display search item settings.Field 3Default value: American. Select date format: American (mm dd, yyyy) or European (dd mm yyyy).Field 4Default value: default. Select styles templateField 5Default value: Disabled. Enable the option to filter results by price.Field 6Default value: List. Select the default view that the search results will first display.Field 7Default value: Enabled. Enable to display results in list view.Field 8Default value: Disabled. Enable to display results in grid view.Field 9Default value: Disabled. Enable to display results on a google map.Field 10Default value: 10. Set the number of results to display on a page.Field 11Default value: Left. Set filters sidebar position: Left, Right and Top.Field 12Default value: United States Dollar ($, USD). Select search default currency.Field 13Default value: Before. Select currency position.
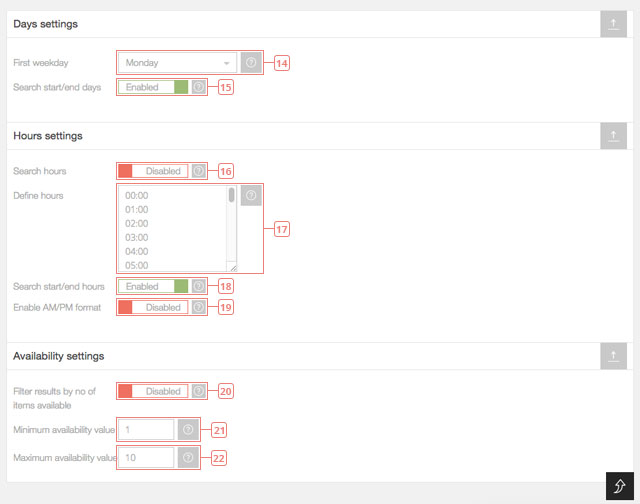
Field 14Default value: Monday. Select search first weekday.Field 15Default value: Enabled. Use start/end days or select only one day to filter results.Field 16Default value: Disabled. Enable hours to use them to filter results.Field 17Enter only hh:mm and add one per line.Field 18Default value: Enabled. Use start/end hours or select only one hour to filter results.Field 19Default value: Disabled. Display hours in AM/PM format. NOTE: Hours definitions still need to be in 24 hours format.Field 20Default value: Disabled. Enable the option to filter results by the number of items available to book.Field 21Default value: 1. Set minimum availability value to filter results.Field 22Default value: 10. Set maximum availability value to filter results.
How to add the search function in a page
To add the search to a page, follow these steps:
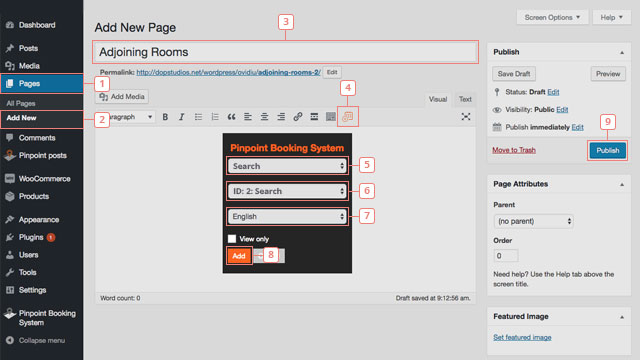
Step 1Click on Pages.Step 2Add a new page.Step 3Edit the name of the search page.Step 4Click on the button to show the Pinpoint Booking System options available.Step 5Select what you want to add (calendar/search widget/search)Step 6Select the Id of the selection from step 5.Step 7Select the language you want it displayed.Step 8Click addStep 9Publish the page to see the changes in your front-end page.
If you already have a page created you can skip steps 2 and 3.
Alternatively, the search can be added using the shortcode [dopbsp item="search" id="search_id" lang="language_shortcode"], where search_id is the id of the search you previously created and language_shortcode is the shortcode of the language you have enabled and want to use.