Administration - Discounts
Set discount values when a client is booking a specific number of days/hours.
You need to select the discounts you want to use in calendar settings. Same discounts can be used in an unlimited number of calendars.
Add a discount
- Step 1 - Click the "plus" button to add a new discount.

After you clicked the button, the discount will appear in the list below.
Set a discount
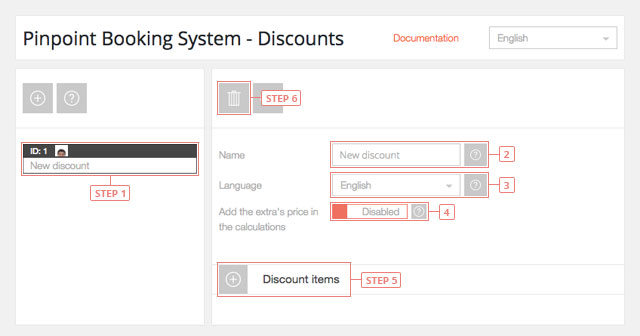
- Step 1 - Select the discount from the list to display the information.
- Field 2 - Change name
- Field 3 - Change to the language you want to edit the discount.
- Field 4 - Add the extras price in the calculations - disabled by default
- Button 5 - Add discount item
- Button 6 - Delete discount

After you clicked the add button, the discount item will appear under it.
Set a discount item
A discount item contains the data for a booked time lapse.
The order of the items gives usage priority. The last item has a higher priority.
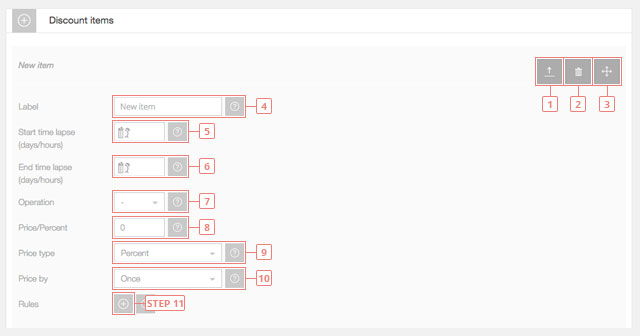
- Button 1 - Toggle item settings
- Button 2 - Delete item
- Button 3 - Sort item

- Field 4 - Enter item label (will be seen by clients).
- Field 5 - Enter the number of days/hours for the beginning of the time lapse. Leave it blank for it to start from 1 day/hour. If you apply it to a calendar that uses day it will mean days, if you use hours in your calendar it will mean hours.
- Field 6 - Enter the number of days/hours for the end of the time lapse. Leave it blank to be unlimited.
- Field 7 - Select item price operation. You can add or subtract a value.
- Field 8 - Enter item price.
- Field 9 - Select item price type. It can be a fixed value or a percent from price.
- Field 10 - Select item price by. The price can be calculated once or by day/hour.
- Button 11 - Add discount item rule.
After you clicked the add button, the discount item rule will appear under it.
Set a discount item rule
A discount item rule sets the discounts for a specific time period.
The order of the rules gives usage priority. The last rule has a higher priority. A rule will also overwrite item data.
- Button 1 - Delete rule.
- Button 2 - Sort rule.

- Field 3 - Enter the rule start date, when the discount item rule will start being used. Leave it blank to start from today.
- Field 4 - Enter rule end date, when the discount item rule will stop being used. Leave blank if you do not want to have an end date.
- Field 5 - Enter rule start hour, when the discount item rule will start being used. Leave it blank so that the rule will begin from the start of the day.
- Field 6 - Enter rule end hour, when the discount item rule will end being used. Leave it blank, so that the rule will expire at end of the day.
- Field 7 - Select rule price operation. You can add or subtract a value.
- Field 8 - Enter rule price
- Field 9 - Select rule price type. It can be a fixed value or a percent from price.
- Field 10 - Select rule price by. The price can be calculated once or by day/hour.