관리 - 캘린더
Path / 관리 영역Calendars This documentation applies to version 2.X of the plugin.여기에서 새 캘린더를 만들거나 기존 캘린더를 복제할 수 있습니다.
새 캘린더를 만들 때는 사용하기 전에 캘린더를 구성해야 합니다. 기존 캘린더를 복제하면 원래 캘린더와 동일한 설정이 적용됩니다.
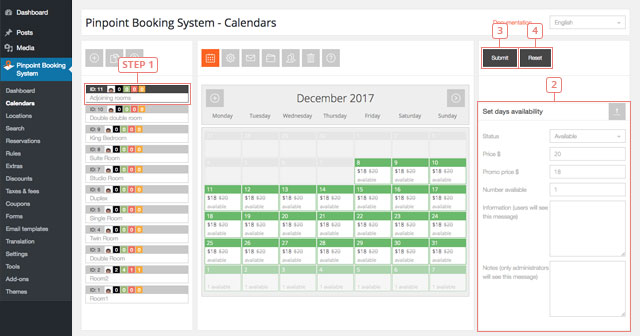
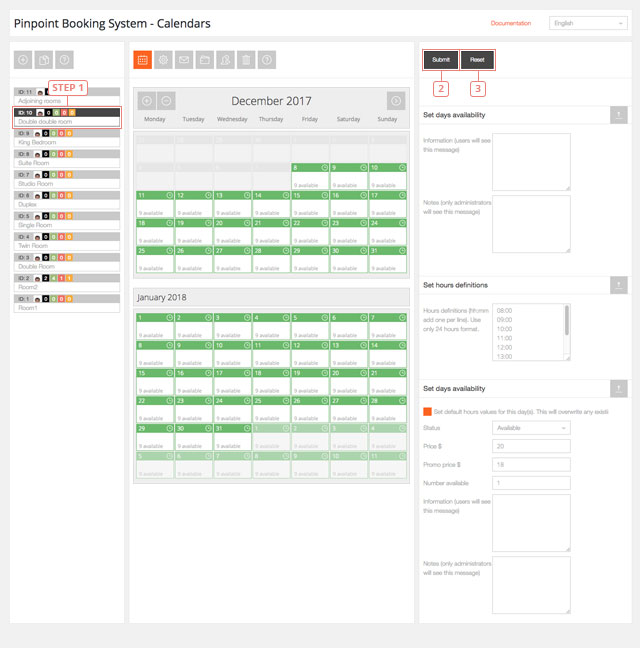
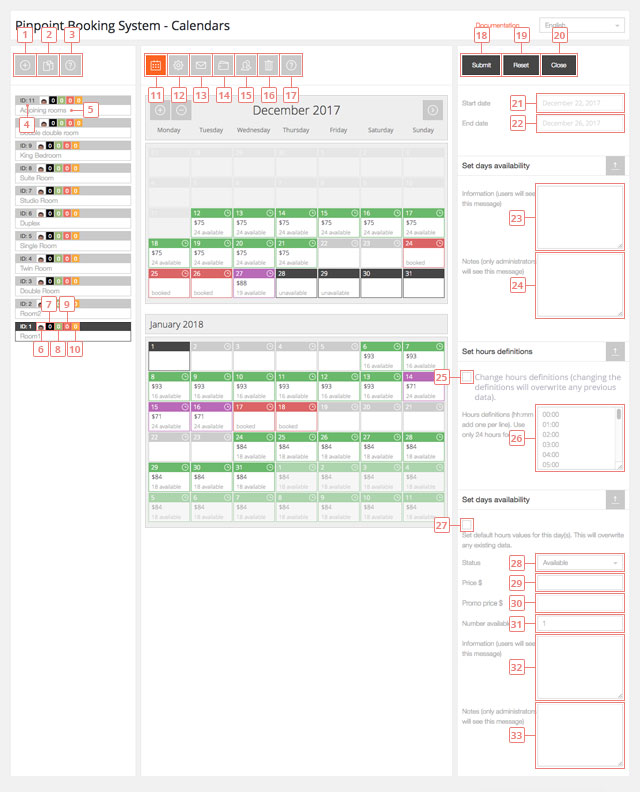
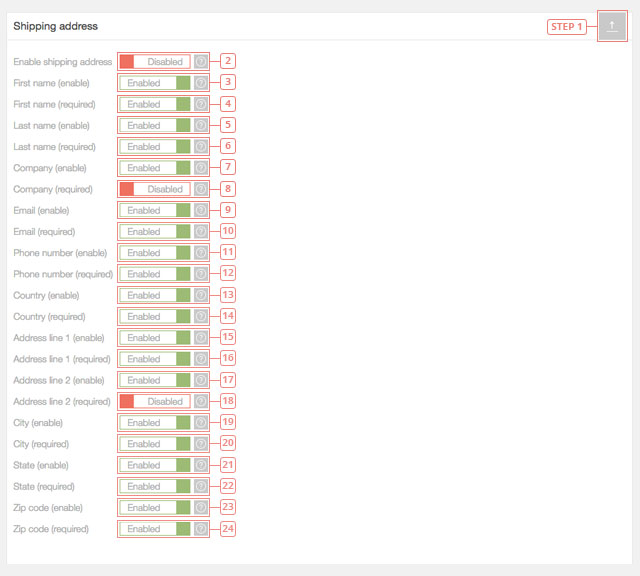
각 캘린더에 대해 사용 가능 여부, 가격, 상태, 날짜 또는 시간 정보를 추가할 수 있습니다.
중요 정보:사용 가능 여부는 기본적으로 설정되지 않습니다(새 캘린더의 상태는 "없음"입니다). 수많은 가능성이 존재하기 때문에 모든 비즈니스 모델에 대해 기본값을 설정할 수는 없습니다. 아래 안내에 따라 캘린더를 만들고 사용 가능성을 설정하는 방법을 참조하세요.
생성할 수 있는 가용성 유형에는 두 가지가 있습니다:
- 달력 전체에 대한 이용 가능 여부 - 이를 기본 이용 가능 여부라고 부르겠습니다.
- 특정 기간 동안의 이용 가능 여부 — 이를 사용자 지정 이용 가능 여부라고 부르겠습니다.
가용성 설정 방법

그 결과 기본 예약 가능 상태가 설정됩니다. 이렇게 하면 캘린더 전체에 대한 예약 가능 상태가 설정됩니다.
사용자 지정 가용성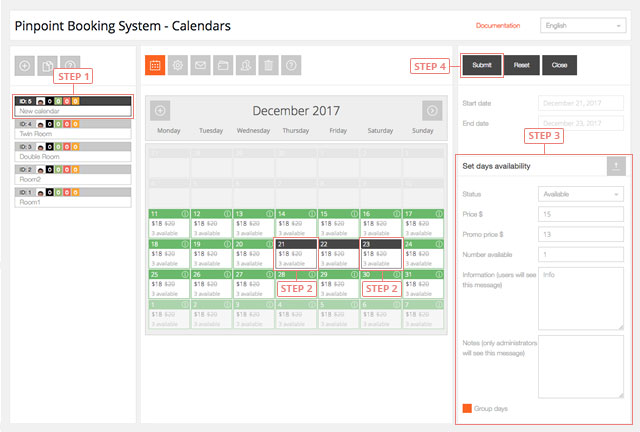
그 결과 사용자 지정 이용 가능 여부가 설정됩니다. 이렇게 하면 선택한 날짜에 대해서만 이용 가능 여부가 설정됩니다.
이제 선택한 날짜의 시간에 대한 사용자 지정 사용 가능 시간을 설정했습니다.
제출을 누르면 매일 생성한 시간 사용 가능 여부가 표시됩니다:
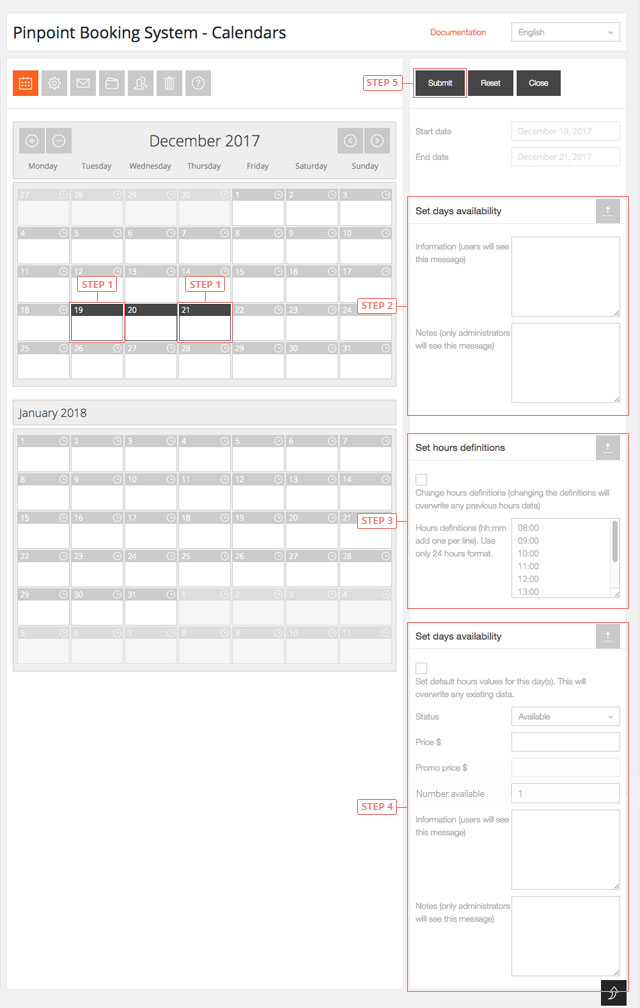
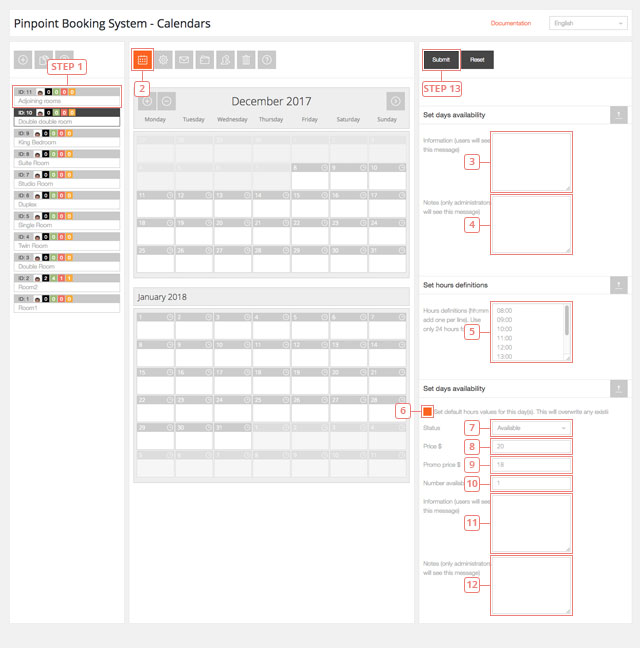
 기본 이용 가능 시간을 수정하려면
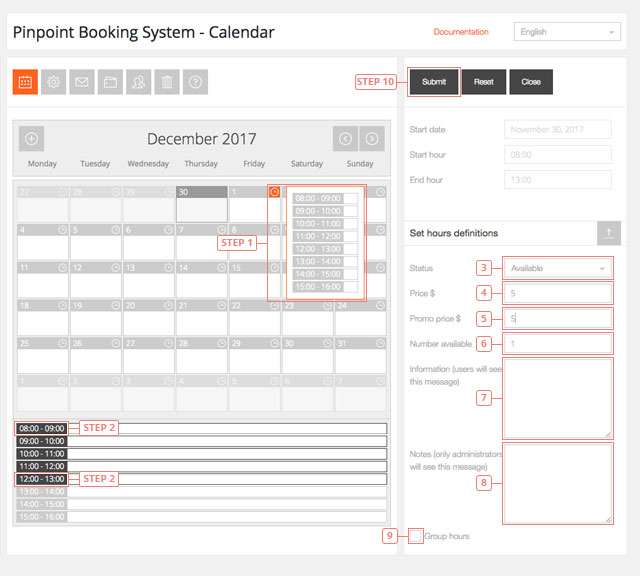
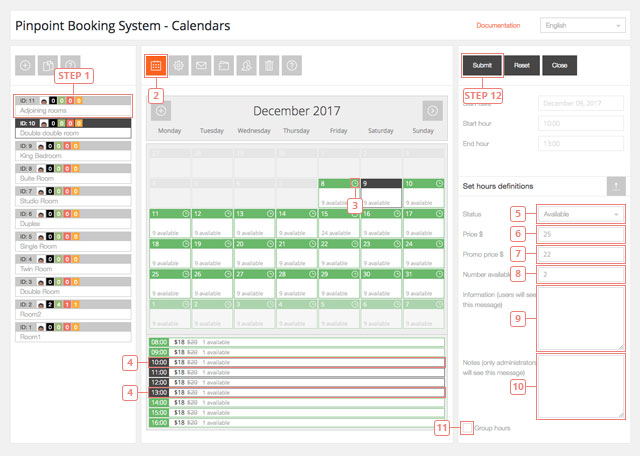
이것이 현재 프로세스의 결과입니다.
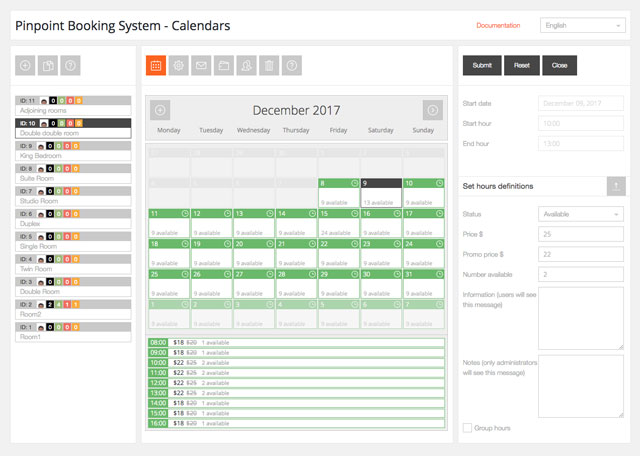
이미 예약된 시간에 대해 새 예약 가능 시간을 생성하면 해당 예약 가능 시간을 덮어쓰게 됩니다.
캘린더 관리 페이지 세부 정보
캘린더 설정 편집

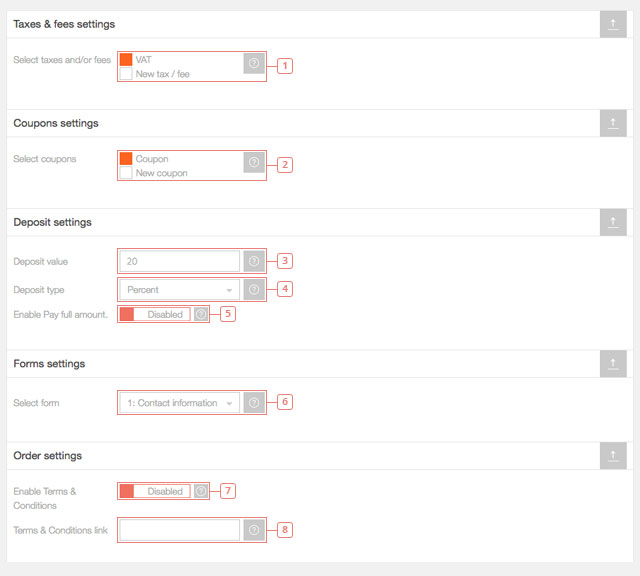
규칙, 추가 항목, 할인, 수수료, 쿠폰 및 양식은 선택하기 전에 미리 생성되어 있어야 합니다.
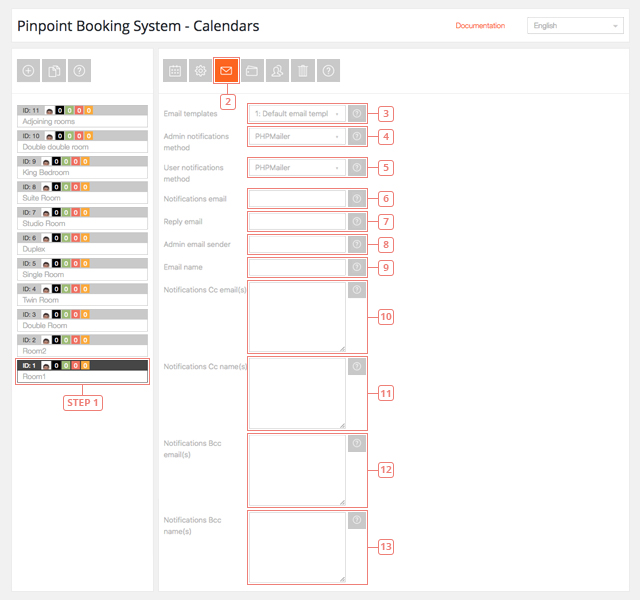
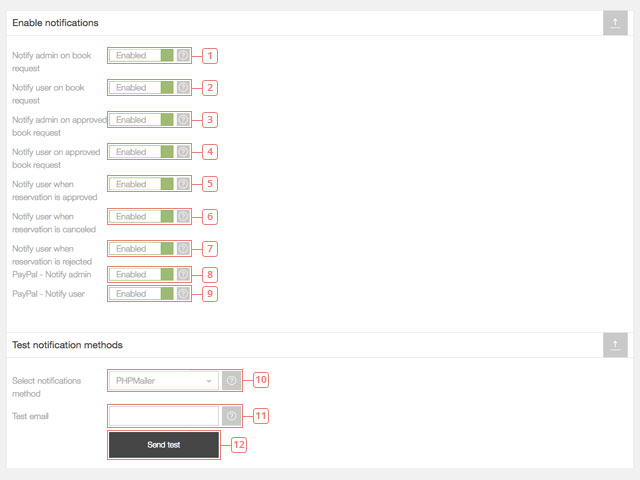
캘린더 알림 설정 편집
여기에서는 캘린더의 알림 설정을 편집할 수 있습니다. 사용할 이메일 템플릿, 이메일 발송 방식, 이메일 알림이 전송되는 상황을 선택할 수 있으며, Clickatell을 통해 SMS 알림을 설정할 수도 있습니다.
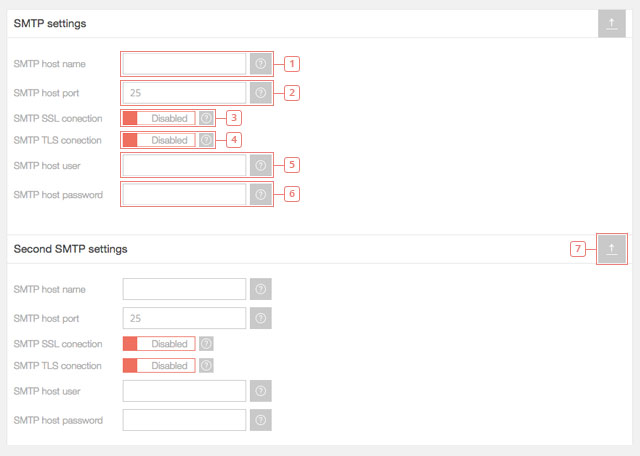
SMTP에 대한 자세한 내용은 여기에서 확인하실 수 있습니다.
이메일이 스팸 폴더로 전송된 경우, SMTP를 운영하는 서버 측에 문의해야 합니다.
Clickatell을 통해 SMS 알림을 수신 및 발송하려면 ‘Central’ 유형의 Clickatell 계정을 사용해야 합니다.
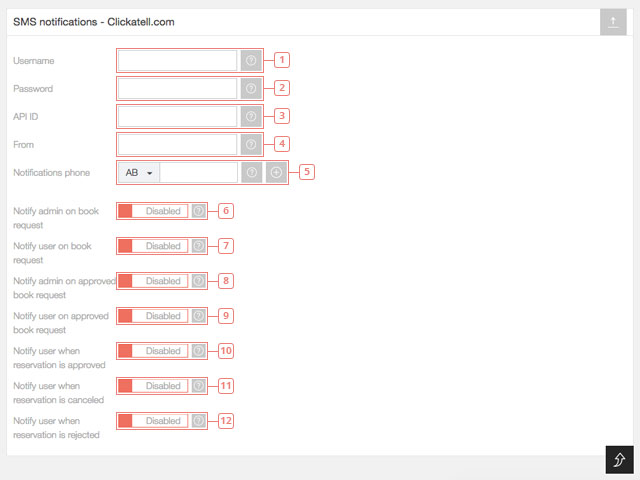
Clickatell을 통해 SMS를 보내려면 크레딧이 필요하기 때문에, 모든 SMS 알림은 기본적으로 비활성화되어 있습니다.
SMS 알림을 보낼 때는 올바른 API를 사용하고 있는지, 그리고 크레딧이 충분한지 반드시 확인하십시오.
이메일 송수신이 원활하게 이루어지려면 여러 가지 요소가 고려되어야 합니다. 이메일을 보내는 기본 방법에는 서버와 SMTP, 이 두 가지가 있습니다.
이메일이 수신자에게 확실히 전달되도록 하는 가장 쉬운 방법은 자체 이메일 서버를 사용하고, 해당 도메인에 등록된 이메일 주소로 이메일을 발송하는 것입니다.
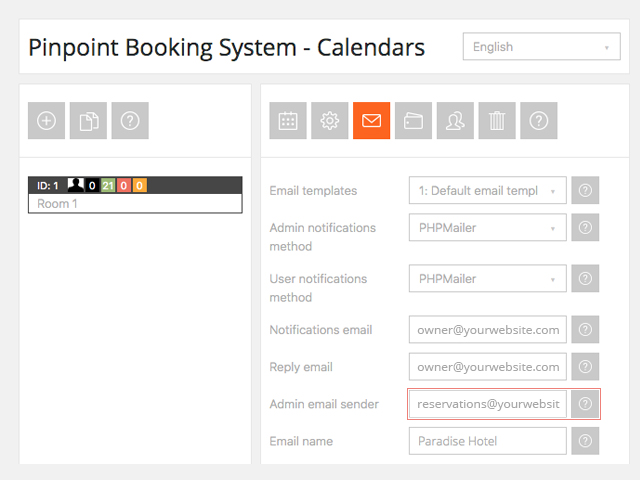
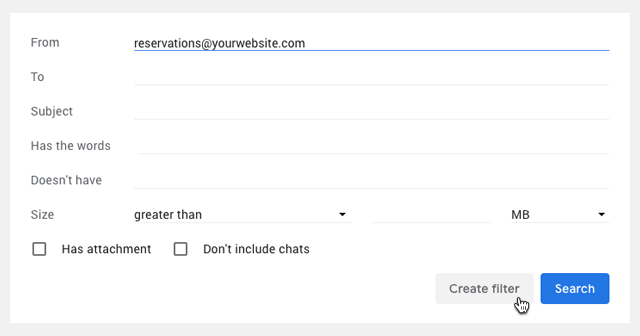
이메일 주소가 없다면 새 주소를 만들거나, 관리자 발신자 필드(답장 주소 필드가 아님)에 가상의 주소를 입력해 주세요. 이메일 주소는 반드시 귀하의 도메인에서 발송되어야 합니다. (예: reservations@yourwebsite.com)
Gmail 계정으로 이메일을 수신하고 싶거나, Yahoo 또는 Outlook 계정으로 이메일을 수신하되, 도메인 이메일에서 해당 이메일이 리디렉션되지 않도록 하려면 몇 가지 추가 설정을 해야 합니다.
이메일 발신자 필드는 사용자가 선호하는 이메일 클라이언트에서 필터를 설정할 수 있도록 돕기 위해 마련되었습니다.
관리자 알림 이메일이 항상 스팸 폴더로 이동하는 경우, 아래에 설명된 지침을 따르시기 바랍니다.
자신의 도메인 이메일 주소와 다른 이메일 주소로 이메일을 보내고 싶을 때는 SMTP를 사용하는 것을 권장합니다.
이메일이 차단되어 스팸 폴더에도 들어가지 않는다면, 서버 이메일 설정을 확인해야 합니다.
SPF 및 DMARC에 대한 자세한 내용을 확인하실 수 있습니다. 이를 구현하는 데 도움이 필요하시면 호스팅 업체에 문의해 주십시오.
Gmail에서 예약 알림이 스팸으로 분류된 경우, 다음 방법을 시도해 보세요.
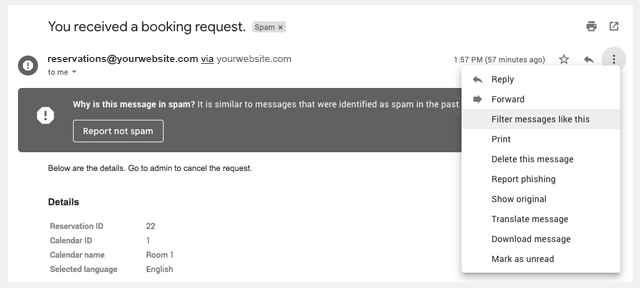
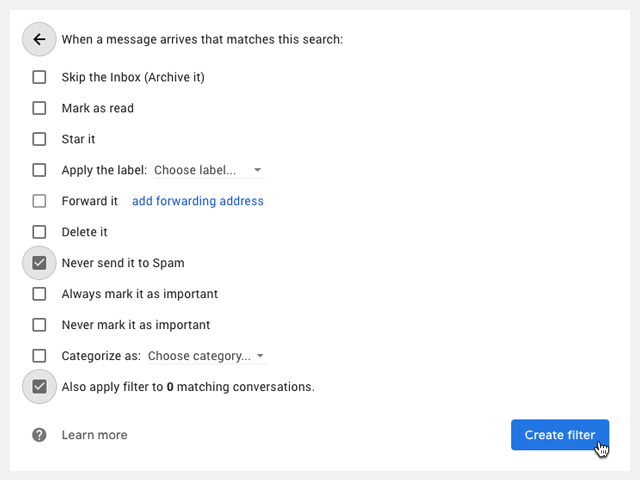
이 기능을 추가한 이유는, 이메일이 고객으로부터 온 것이라면 (비록 귀하의 메일 서버를 통해 전송된 경우라 하더라도) 필터를 생성할 수 없기 때문입니다.
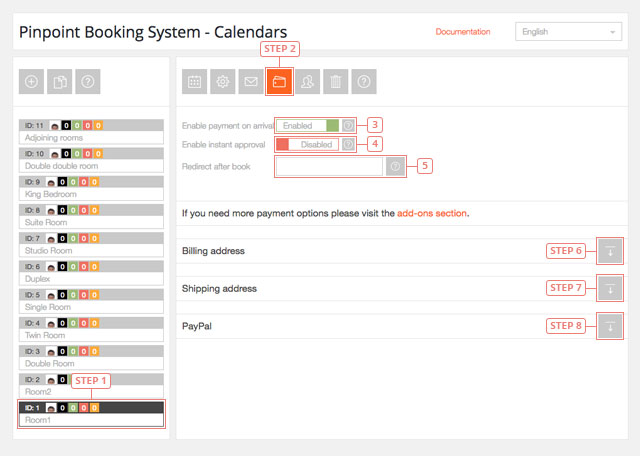
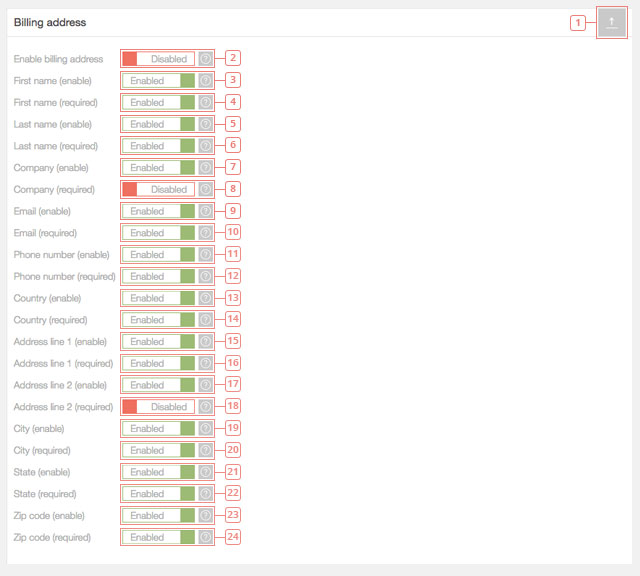
달력 결제 게이트웨이 편집
여기에서는 결제 게이트웨이를 편집하고, 도착 시 결제 또는 예약 요청 즉시 승인(결제 없이) 기능을 활성화하며, 예약 완료 후 다른 페이지로 이동하도록 설정할 수 있습니다. 다른 결제 게이트웨이 애드온을 추가한 경우에도 이곳에서 해당 설정을 구성할 수 있습니다.
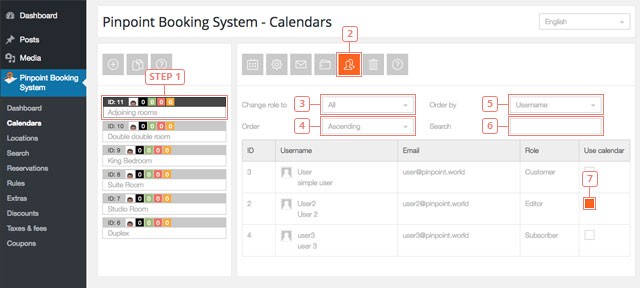
사용자 권한 편집
여기에서 특정 사용자에게 캘린더 사용 권한을 부여할 수 있습니다. 기본적으로 캘린더 소유자와 관리자만 캘린더를 보고 사용할 수 있습니다.
캘린더 삭제
캘린더 소유자만 자신이 만든 캘린더를 삭제할 수 있습니다.
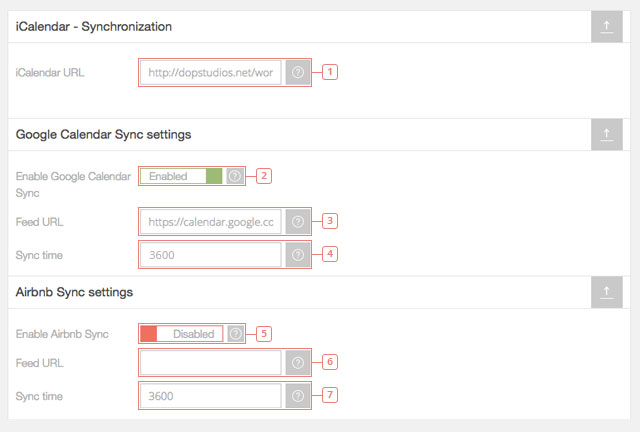
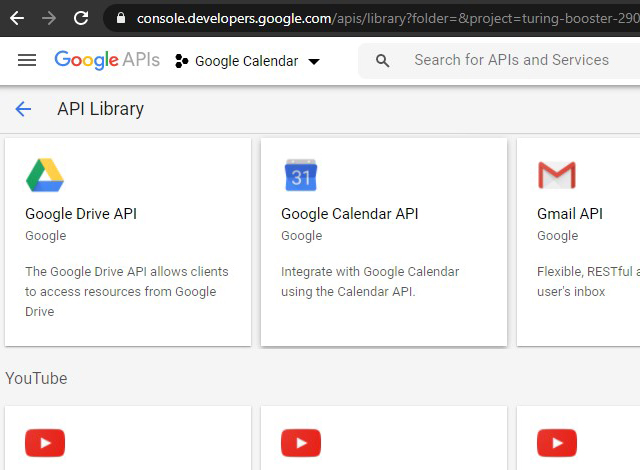
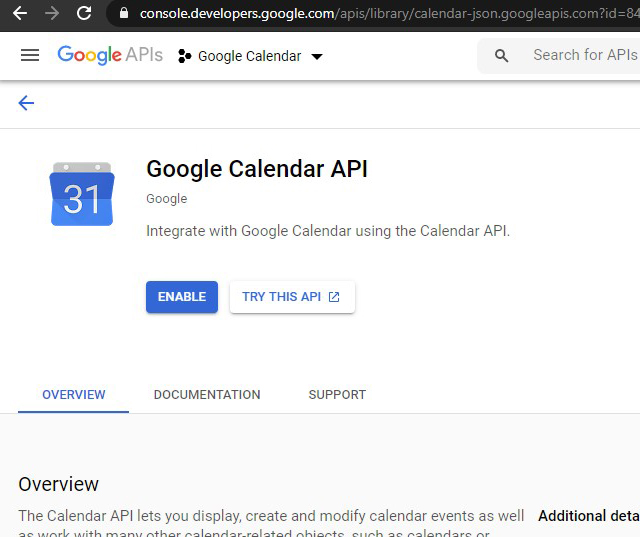
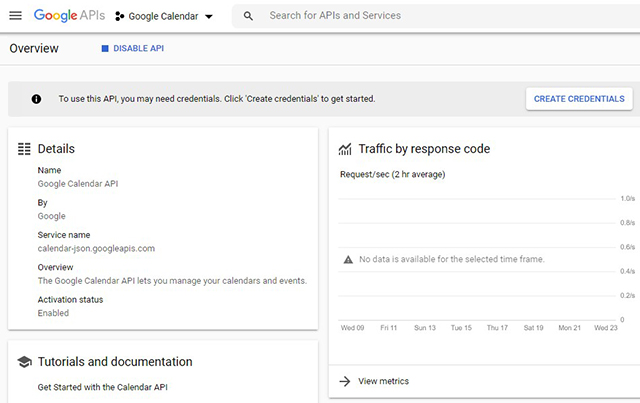
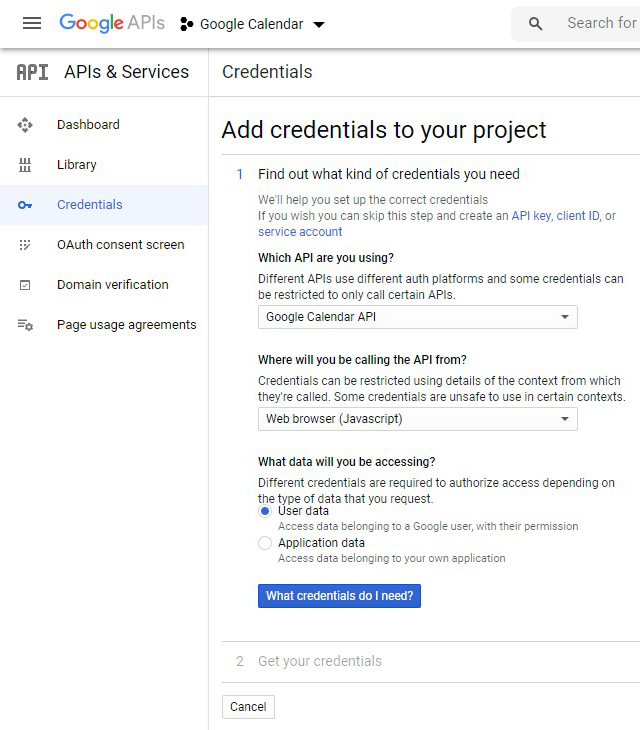
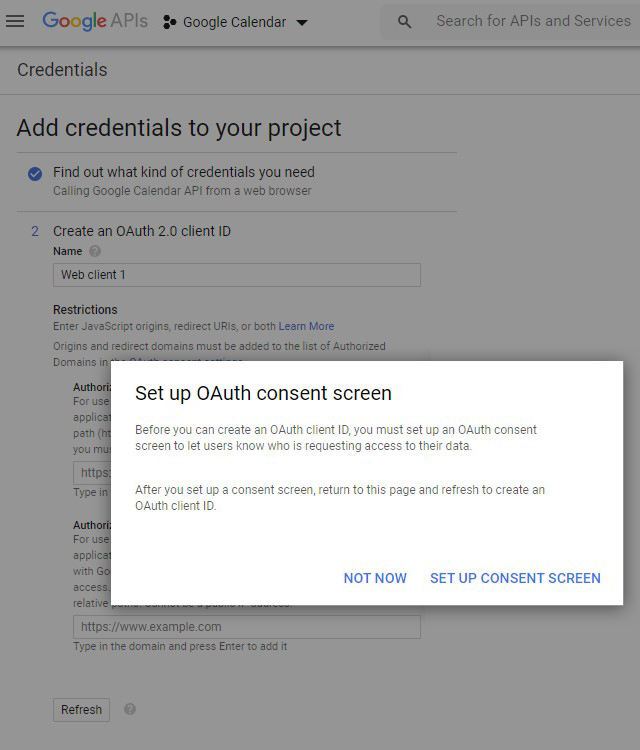
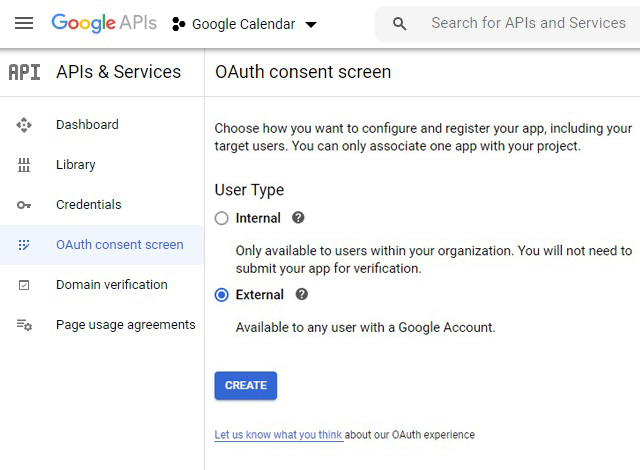
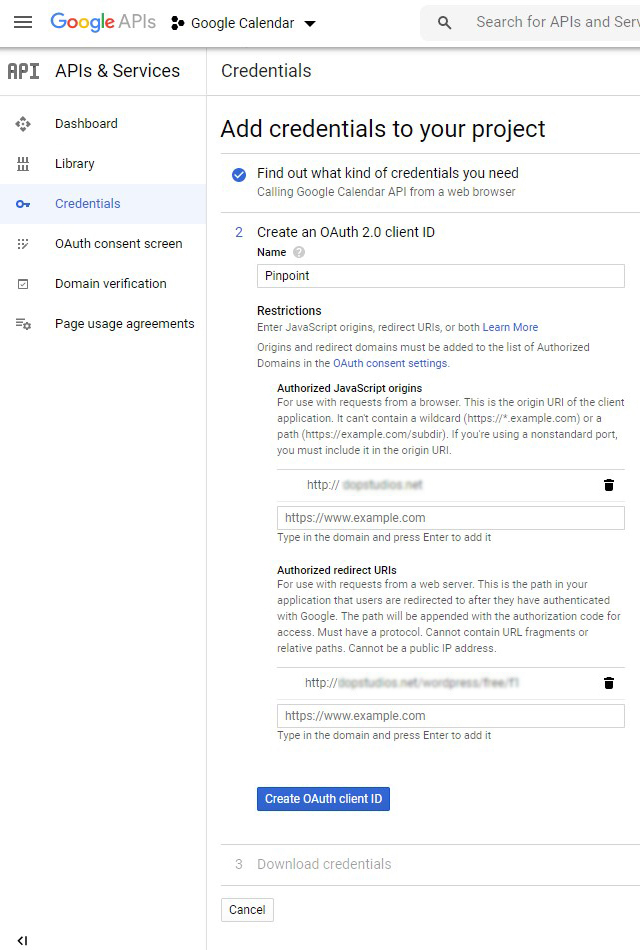
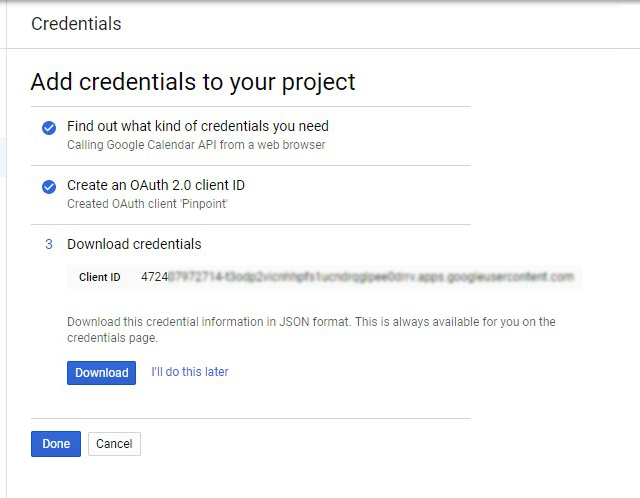
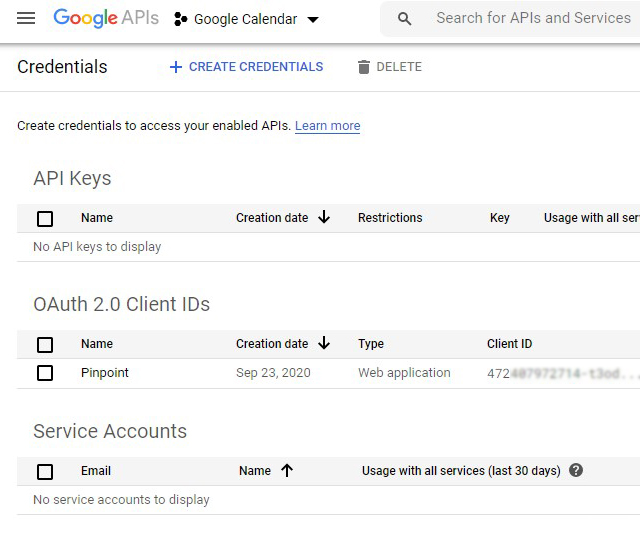
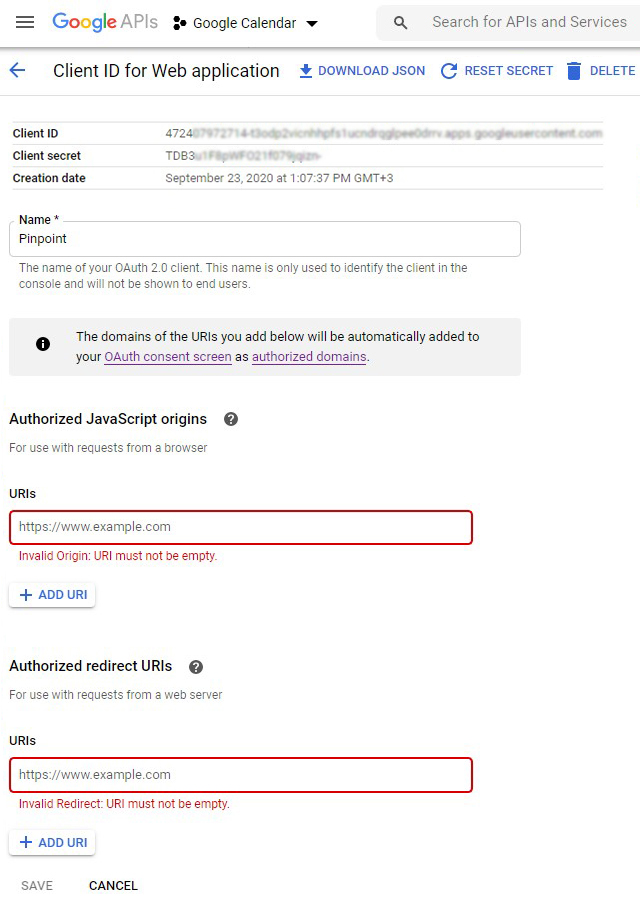
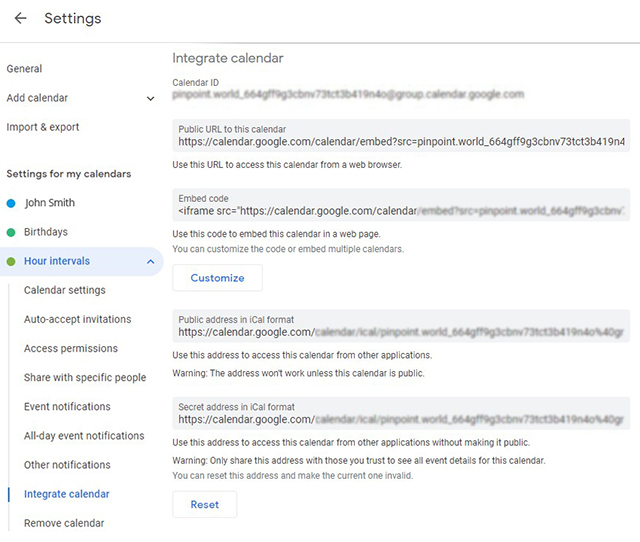
Google 캘린더와 에어비앤비 연동
Pinpoint Booking System(PBS) 캘린더를 다른 캘린더와 동기화하면, 가져온 예약 내역이 실제 예약으로 생성되며 ‘예약’ 탭에서 관리할 수 있습니다. 동기화를 통해 생성된 예약에는 “Google/Airbnb와 동기화됨”이라는 세부 정보가 표시되며, 양식은 비어 있습니다(아직 편집할 수 없음).
일단 가져오기가 완료되면, 동기화를 비활성화하더라도 예약 내역은 저장된 상태로 유지됩니다. iCal 파일을 통해 전송되는 것은 예약 내역뿐입니다. 즉, 예약 내역만 가져오거나 내보낼 수 있습니다. 예약 가능 여부, 보류 중인 예약 또는 취소된 예약은 가져오거나 내보낼 수 없습니다.
Google 캘린더의 예약 내역이 동기화됩니다. Pinpoint 캘린더나 Google 캘린더에서 새로 생성된 예약은 페이지를 새로 고침하면 두 캘린더 모두에 반영됩니다. Pinpoint 캘린더는 캘린더를 불러올 때마다 또는 새 예약을 생성할 때마다 동기화됩니다(Google 캘린더에 이미 동일한 예약이 생성되지 않았는지 확인하기 위함입니다).
각 캘린더 유형마다 별도의 캘린더를 사용해 주세요. 시간 단위만 설정된 캘린더의 날짜를 동기화하려고 하면 작동하지 않습니다. 예약 내역은 확인할 수 있지만, 예약 가능 여부에 아무런 영향도 미치지 않습니다.
각 캘린더마다 별도의 인증 정보가 필요하지만, 구글 캘린더 인증은 한 번만 수행하면 되며, 이때 생성된 토큰은 모든 캘린더에서 사용할 수 있습니다.
현재는 하나의 Google 계정만 동기화를 수행할 수 있습니다.
캘린더를 처음 동기화할 때는 ‘동기화 시간’ 설정을 무시하고 즉시 동기화가 진행됩니다. 캘린더를 불러오면, 가져온 캘린더의 예약 내역을 바로 확인할 수 있습니다. 초기 동기화가 완료된 후에는 사용자가 설정한 주기에 따라 동기화가 이루어집니다.
‘예약’ 탭에서 에어비앤비나 구글을 통해 이루어진 모든 예약에 대해 PBS에 해당 예약 내역이 등록되어 있음을 확인할 수 있습니다.
동기화 시간을 어떻게 설정하든, 고객이 예약을 시도할 때 당사는 예약을 전송하기 전에 달력을 동기화합니다. 이를 통해 중복 예약이 발생하지 않습니다. 예시: 고객이 12월 3일이 예약 가능하다고 확인하고 예약을 진행하려는데, 동시에 다른 고객이 이미 에어비앤비에서 해당 날짜를 예약한 경우입니다. 고객이 Pinpoint 예약 시스템에서 ‘지금 예약하기’를 클릭하면, 선택한 기간이 더 이상 예약 가능하지 않으므로 다른 날짜를 선택해야 한다는 메시지가 표시됩니다. 이는 즉시 승인되는 예약에만 적용됩니다. 관리자의 승인이 필요한 예약은 여전히 ‘예약’ 탭에 표시되지만, 에어비앤비나 구글 캘린더에 동일한 기간의 예약이 있는 한 해당 예약을 승인할 수 없습니다.
예약 정보를 내보낼 때, 해당 예약에는 표준 정보(상태, 캘린더 이름 및 예약 번호)가 포함됩니다.
동일한 유형의 캘린더끼리만 동기화해 주세요: ‘일’ 단위 캘린더는 ‘일’ 단위 캘린더와, ‘시간’ 단위 캘린더는 ‘시간’ 단위 캘린더와 동기화해야 합니다. 예: 에어비앤비 캘린더는 ‘일’ 단위만 표시되고 ‘오전 체크아웃’이 활성화된 PBS 캘린더와만 동기화해야 합니다. Airbnb 캘린더를 ‘시간’ 단위만 설정된 PBS 캘린더와 동기화하려고 시도하지 마세요. 작동하지 않습니다!
iCal 파일의 보안을 강화하기 위해 암호화 기능을 추가했습니다. 새로운 iCal 링크를 복사한 후 에어비앤비와 구글 캘린더에서 다시 동기화해야 합니다. 기존 링크는 더 이상 작동하지 않습니다.
Google 캘린더의 경우:- PBS에 날짜가 지정된 캘린더에서만 “종일 일정”을 동기화하십시오. 캘린더에 시간 정보도 포함되어 있다면 동기화가 제대로 이루어지지 않습니다.
- 시간대별 예약만, 해당 시간대를 설정한 PBS 캘린더에 동기화합니다.
- 달력을 만들고 운영 시간을 설정하세요.
- 구글과 동기화하기 위해 캘린더를 특별히 생성하는 경우, 동일한 유형의 캘린더를 만들어 주세요(예를 들어, 14:15부터 15:30까지 예약이 있다면, 15시부터 15분 단위로 시간을 지정하는 캘린더를 만들어야 합니다). 그렇지 않으면 제대로 작동하지 않습니다.
- 동기화를 활성화하기 전에 사용 가능 여부를 설정하십시오.
- 캘린더를 동기화하기 전에 Google 캘린더와 동일한 시간대를 설정하세요.
// $message = str_replace('|FORM|', $this->getForm($reservation).' | ', $message);
$message = str_replace('|FORM|', '', $message);
dopbsp/includes/reservations/class-backend-reservations.php 파일에서 첫 번째 줄의 주석 표시를 제거하고 두 번째 줄을 삭제하십시오.