WooCommerce에서 Pinpoint 예약 시스템을 사용하는 방법
이 문서는 플러그인의 2.X 버전에 적용됩니다.WooCommerce에 예약 캘린더를 연동하려면 다음 단계를 따르세요:
단계 1간단한 WooCommerce 상품을 생성하세요.단계 2상품에 가격을 입력하세요.단계 3해당 상품의 Pinpoint 예약 시스템 탭에 달력을 추가하고, 언어와 장바구니에 담기 버튼의 스타일을 선택하세요.
다음은 캘린더와 상품 생성 기능, 그리고 이 두 기능이 어떻게 연동되는지에 대한 예시입니다.
달력 만들기
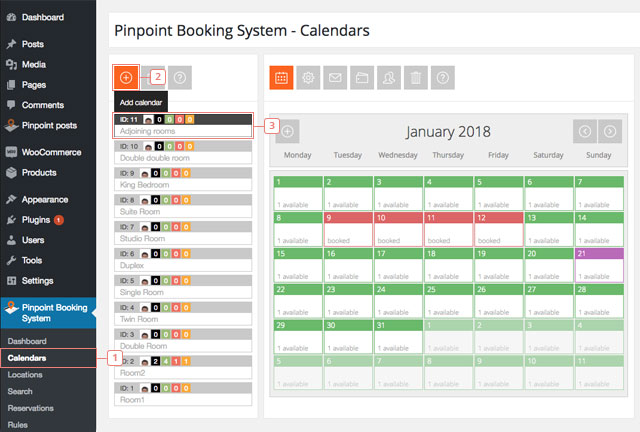
단계 1'캘린더'를 클릭하세요.단계 2새 캘린더를 추가하려면 여기를 클릭하세요. 기존 캘린더를 사용하려면 3단계로 건너뛰세요.단계 3캘린더를 선택하고 이름과 캘린더 ID를 기억해 두세요. WooCommerce 상품에 연결하기 전에 이용 가능 시간을 설정하고 가격을 추가하는 것이 좋지만, 나중에 수정할 수도 있습니다.
간단한 WooCommerce 상품을 생성하고 달력을 연결하세요
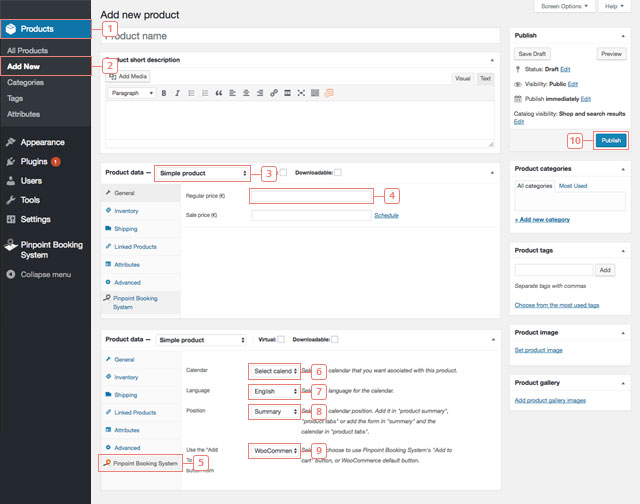
단계 1'WooCommerce 상품' 탭을 클릭하세요.단계 2새로 추가를 클릭하세요. 새 상품을 추가할 수 있는 페이지가 표시됩니다. 새 상품을 생성하지 않으려면 모든 상품 탭에서 이미 생성된 상품을 선택해야 합니다.단계 3'상품 간략 설명' 입력란 아래에서 상품 정보: 일반 상품.을(를) 선택해야 합니다.단계 4가격을 입력하세요. 가격 필드는 비워둘 수 없습니다. 장바구니에 추가되는 가격은 캘린더에서 일/시간 단위로 설정한 가격이 적용되지만, WooCommerce에 상품 가격이 설정되어 있지 않으면 장바구니에 담기 버튼이 표시되지 않습니다.단계 5상품 설정에서 Pinpoint 예약 시스템 탭을 클릭하세요.단계 6제품에 연결할 캘린더를 선택하세요(클릭하면 보유한 모든 캘린더가 표시된 드롭다운 메뉴가 나타납니다). 캘린더가 하나도 표시되지 않는다면, 귀하가 관리자나 캘린더 소유자가 아니라는 의미입니다.단계 7달력의 언어를 선택하세요.단계 8달력의 위치(상품 요약 또는 상품 탭)를 선택하세요.단계 9장바구니에 담기 버튼을 선택하세요. WooCommerce 버튼이나 Pinpoint 예약 시스템 버튼 중에서 선택할 수 있습니다.단계 10상품 편집을 마친 후 ‘게시’를 클릭하면 상품 페이지에서 변경 사항을 확인할 수 있습니다.
제품 페이지에서 예약 일정을 확인하세요
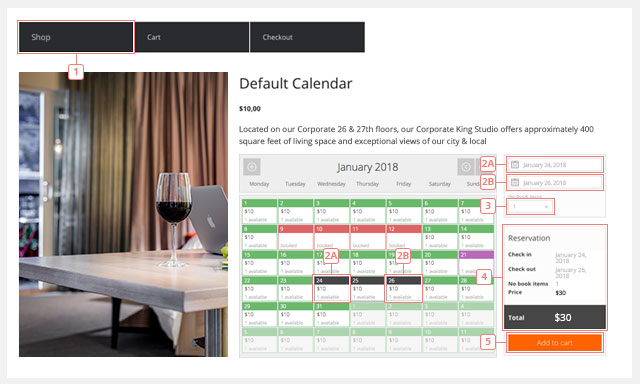
단계 1상품 페이지로 이동하세요.단계 2달력에서 날짜를 선택하세요.단계 3예약하고자 하는 상품 수를 선택하세요.단계 4변경 사항을 적용할 때마다 예약 내역이 자동으로 업데이트됩니다. 상품을 추가하거나 숙박 일수를 늘리면, 그에 따라 가격도 자동으로 업데이트됩니다.단계 5준비가 되면 장바구니에 담기를 클릭하세요. ‘장바구니에 담기’ 기능의 동작은 변경할 수 있습니다. 상품을 성공적으로 장바구니에 담은 후 장바구니 페이지로 이동하도록 설정하거나, 쇼핑을 계속할 수 있도록 설정할 수 있습니다. 동일한 캘린더나 다른 캘린더에서 예약을 더 추가할 수 있습니다. 웹사이트를 둘러보는 동안 해당 기간이 이미 예약되었거나, 선택한 기간이 겹치는 경우 오류 메시지가 표시됩니다.
장바구니에 추가된 예약 내역 보기
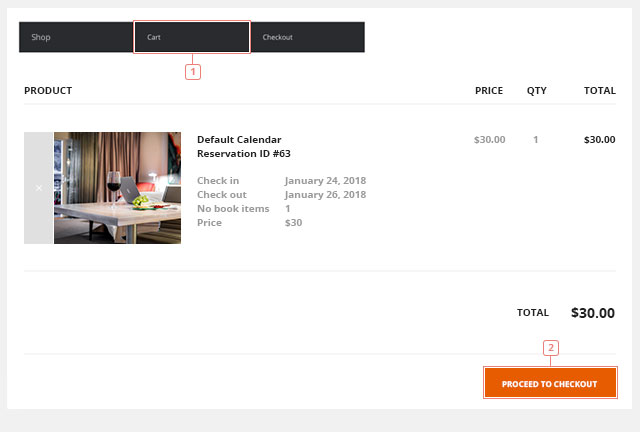
단계 1장바구니에 담으시면 해당 예약 내역을 확인하실 수 있습니다. 예약 내역에는 가격 외에도 캘린더 이름, 임시 예약 ID 및 예약된 시간이 표시됩니다.단계 2준비가 되셨다면 결제 진행을 클릭하세요.
주문 완료
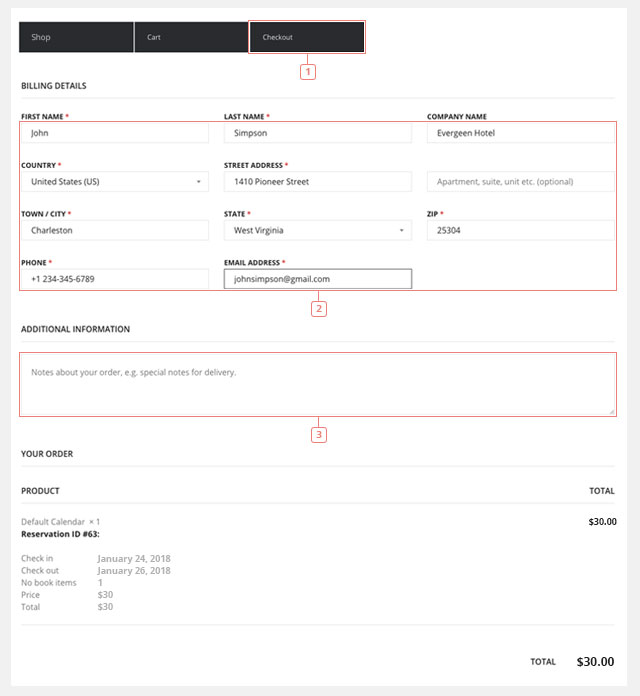
단계 1결제 페이지에서는 청구지 주소를 입력해야 합니다.단계 2청구지 주소는 WooCommerce에서 사용되기 때문에 중요합니다. 이 시점부터는 더 이상 Pinpoint Booking System의 일부가 아니며, 확인 이메일은 WooCommerce에서 발송됩니다.단계 3해당되는 경우 추가 정보를 기재해 주십시오.단계 4결제를 진행해 주세요.
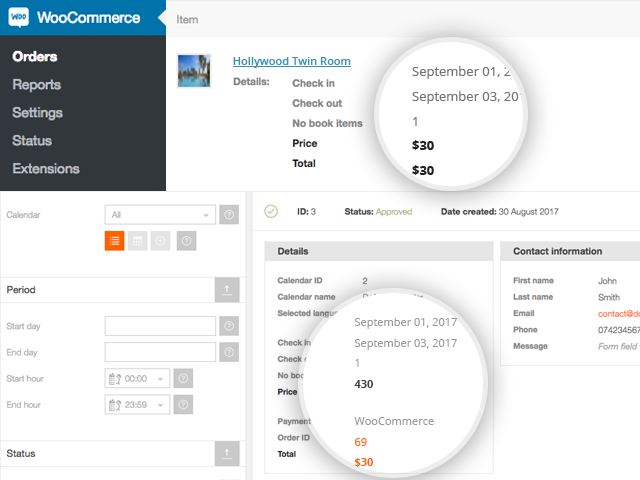
결제가 완료되면 WooCommerce의 ‘주문’ 탭에서 해당 예약을 확인할 수 있습니다. 또한 Pinpoint 예약 시스템에도 해당 예약이 등록됩니다. 이 예약은 결제 수단이 WooCommerce로 설정된 일반 예약과 동일하게 표시되며, 주문 ID가 함께 표시됩니다. 이 주문 ID는 WooCommerce의 주문 ID와 일치합니다.
예약에 선택한 기간은 자동으로 ‘예약 완료’로 표시됩니다.
알아두면 좋은 점:
- 가격은 WooCommerce 상품 가격이 아닌, 캘린더에서 설정한 가격을 기준으로 계산됩니다.
- 가변 상품의 경우에는 작동하지 않습니다.
- 주문을 삭제하면 예약도 함께 삭제됩니다.